Create a transaction insights snap
This tutorial walks you through creating a snap that calculates the percentage of gas fees that a user would pay when creating a transaction. The snap provides transaction insights in the MetaMask transaction window.
Prerequisites
An account on your MetaMask Flask instance with testnet ETH
tipYou can use Infura's Sepolia faucet to get Sepolia ETH.
A text editor (for example, VS Code)
Yarn version 3
Steps
1. Set up the project
Create a new snap project using the @metamask/create-snap CLI by running:
yarn create @metamask/snap transaction-insights-snap
or
npm create @metamask/snap transaction-insights-snap
Next, cd into the transaction-insights-snap project directory and run:
yarn install
This initializes your development environment with the required dependencies.
2. Enable transaction insights and the Ethereum provider
The default template snap, such as the one in Create a gas estimation snap, is set up to expose a JSON-RPC API with a simple hello command, which brings up a dialog box. In contrast, the snap you're creating in this tutorial doesn't expose any API. Instead, it provides transaction insights directly in the MetaMask transaction window.
In particular, the snap shows the user the percentage of gas fees they would pay for their transaction.
It gets the current gas price by calling the
eth_gasPrice RPC
method using the global Ethereum provider made available to snaps.
To enable your snap to provide transaction insights and use the global Ethereum provider, open
/packages/snap/snap.manifest.json in a text editor.
Request the
endowment:transaction-insight and
endowment:ethereum-provider
permissions by modifying initialPermissions:
"initialPermissions": {
  "endowment:transaction-insight": {},
  "endowment:ethereum-provider": {}
}
3. Calculate and display the percentage of gas fees
To calculate and display the gas fees a user would pay as a percentage of their outgoing transaction,
replace the code in /packages/snap/src/index.ts with the following:
import { OnTransactionHandler } from '@metamask/snaps-types';
import { heading, panel, text } from '@metamask/snaps-ui';

// Handle outgoing transactions.
export const onTransaction: OnTransactionHandler = async ({ transaction }) => {

  // Use the window.ethereum global provider to fetch the gas price.
  const currentGasPrice = await window.ethereum.request({
    method: 'eth_gasPrice',
  });

  // Get fields from the transaction object.
  const transactionGas = parseInt(transaction.gas as string, 16);
  const currentGasPriceInWei = parseInt(currentGasPrice ?? '', 16);
  const maxFeePerGasInWei = parseInt(transaction.maxFeePerGas as string, 16);
  const maxPriorityFeePerGasInWei = parseInt(
    transaction.maxPriorityFeePerGas as string,
    16,
  );

  // Calculate gas fees the user would pay.
  const gasFees = Math.min(
    maxFeePerGasInWei * transactionGas,
    (currentGasPriceInWei + maxPriorityFeePerGasInWei) * transactionGas,
  );

  // Calculate gas fees as percentage of transaction.
  const transactionValueInWei = parseInt(transaction.value as string, 16);
  const gasFeesPercentage = (gasFees / (gasFees + transactionValueInWei)) * 100;

  // Display percentage of gas fees in the transaction insights UI.
  return {
    content: panel([
      heading('Transaction insights snap'),
      text(
        `As set up, you are paying **${gasFeesPercentage.toFixed(
          2,
        )}%** in gas fees for this transaction.`,
      ),
    ]),
  };
};
4. Build and test the snap
To build and test your snap:
From the command line, run
yarn startin the root of your project. This starts two development servers: one for watching and compiling the snap, and another for the React site. The snap bundle is served fromlocalhost:8080, and the site is served fromlocalhost:8000. You should get a message that includes:You can now view site in the browser.
http://localhost:8000/Open
localhost:8000in your browser (with MetaMask Flask installed).Select Connect, and accept the permission request.
After connecting, you're prompted to install the snap with the Fetch and display transaction insights and Access the Ethereum provider permissions. Select Approve & install.
From MetaMask Flask, create a new testnet ETH transfer. You can set up multiple accounts to transfer between your accounts.
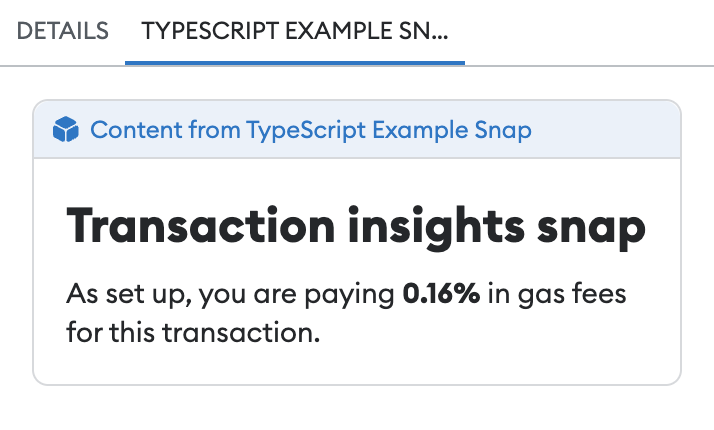
On the confirmation window, switch to the tab named TYPESCRIPT EXAMPLE SNAP. Switching to the tab activates the
onTransactionexport of your snap and displays the percentage of gas fees in the transaction insights UI:

5. Display a different UI for contract interactions
The snap should only display a gas fee percentage if the user is doing a regular ETH transfer.
For contract interactions, it should display a UI that conveys that message.
Add the following code to the beginning of the onTransaction export:
if (typeof transaction.data === 'string' && transaction.data !== '0x') {
  return {
    content: panel([
      heading('Percent Snap'),
      text(
        'This snap only provides transaction insights for simple ETH transfers.',
      ),
    ]),
  };
}
6. Next steps
The initial project has generic names in multiple places.
You can update the fields in snap.manifest.json to match your custom snap:
proposedName- The name of your snap. This replaces TYPESCRIPT EXAMPLE SNAP in the transaction insights UI.description- The description of your snap.repository- The URL of your cloned GitHub repository.source- Theshasumis set automatically when you build from the command line. If you decided to publish your snap to npm, update thelocationto its published location.
Similarly, you should update the name, version, description, and repository sections of
/packages/snap/package.json even if you don't plan to publish your snap to npm.
The version field in snap.manifest.json inherits the version field from package.json.
Lastly, you can update the content of /packages/site/src/pages/index.tsx, such as removing the
template Send Hello button.
Once you've made all necessary changes, you can publish your snap to npm.